
*Update – 13/07/16*
We have recently tested posting portrait photos (taken on a mobile) via both PC and mobile devices. We have also tested images that have been edited on the PC before uploading them in a tweet. We are no longer having any issues with pictures displaying sideways. Hopefully this means Twitter has rectified this frustration. Good luck!
Our original post – 3/10/14
Have you had trouble with Twitter displaying your portrait photos as landscape images in your twitter posts? It’s not great to have your image showing sideways is it?
Here’s what you need to know to avoid this happening or how to fix it when it does.
This happened to me when I posted a tweet following an early morning networking event. Initially I had downloaded a portrait image from my ipad to my laptop and resized it to be a lower resolution to go on social media.
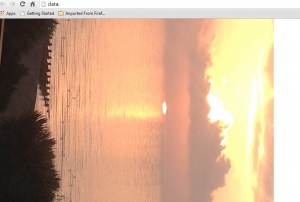
I then went to Twitter and did my post – see image below. This all looked ok.

However, when I tweeted this is what it looked like:

EEK! The photo has displayed landscape instead of portrait – despite having been correct on your laptop when you uploaded it.
What can you do?
The answer is different depending on the device you are using! (Although Twitter may change this at some point.)
1. Laptop
Upload your tweet and photo as per image 1 above. BEFORE you click TWEET, click on the photo itself and it will show you how Twitter is actually seeing the image. In this scenario, the photo looked fine in the Twitter post window (image 1), but when I click on the image this is what it showed:
Twitter is deceiving me! It will actually post the photo the wrong way around AND gives me no functionality to rotate it within Twitter. If you don’t want to keep this post with the photo the wrong way up, you will have to delete it.
SO – the rule is – always click on the photo before you post to check what orientation Twitter will use in your post. If it is wrong, you may have to abandon the post and do it on your phone’s Twitter app instead. This is because you CAN rotate an image within the mobile app but not on a laptop at this time.
Very frustrating. To use the mobile app instead, you would have to email the photo to yourself, pick it up on your mobile, save the image to your camera roll and then go to your twitter app and redo your tweet and attach the photo…. See final steps to rotate the image below.
2. Mobile Phone Twitter App
So how are things different on a mobile phone? The good news is that there is functionality to rotate your image if you need to.
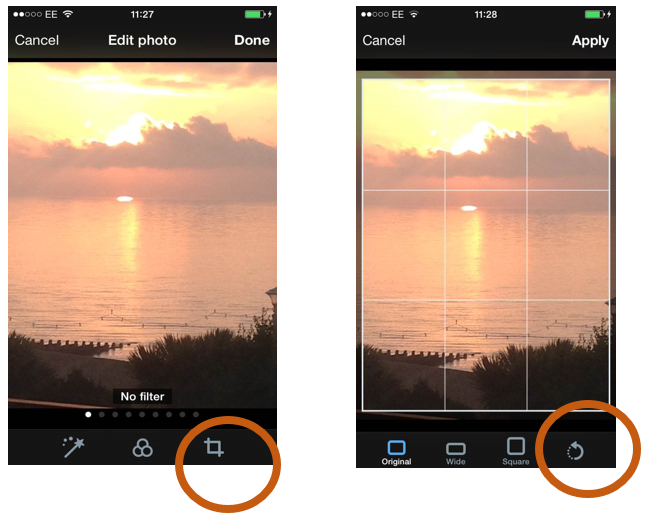
Step 1: Write your tweet and add the photo.

Step 2: Click on the photo itself and you will see this. Where is the rotate button you may ask? Well you need to click on the CROP icon – bottom right of the screen. In the next screen that you see, click on the circular arrow icon at the bottom right of the screen. This will allow you to rotate your image (just keep pressing the icon to keep turning.) Click APPLY and go back to your tweet and tweet!
A bit more info about photos
Twitter says that the size and file types that it accepts are:
- Photos can be up to 5MB; animated GIFs can be up to 3MB.
- We accept GIF, JPEG, and PNG files.
- We DO NOT accept BMP or TIFF files.
- Your photo will be automatically scaled for display in your expanded Tweet and in your user gallery.
Good Luck!
Why not read another blog about loading multiple photos and tagging people on Twitter?
If you think some one-to-one or small group Twitter, Facebook or LinkedIn training would be useful for you, please read more.


Thanks so much for the article. I just found a faster way to rectify the problem. Simply open the photo or its preview on your computer/phone. Take a screenshot (or partial screenshot if your device has that capability) of the photo. Save the screenshot and use it as your photo file for Twitter. The saved screenshot will be upright and so will the Twitter image. Hope this helps! Have a great day!
Thanks so much for your comments – we’ll check that out!
Another way is to open the photo in Microsoft Office, turn it the direction to make it upright in Twitter. Save it and upload it into Twitter. This works for me!
Thanks Sandy!
What I do is click on the picture I’m uploading from my desktop, right click on it and then select to turn the picture “clockwise” “counterclockwise” I keep going until the picture is finally the way I like it. Not the fastest way but it works.
If you are using Windows 8 or Windows 10, the “Rotate Right” or “Rotate Left” option that comes with File Explorer does not actually rotate the photos. It actually just updates the “Orientation” flag in the EXIF data of the JPG file (http://www.ivertech.com/Articles/Image-Rotation-Issue-With-Windows-10.aspx). It might look “normal” on your computer, but when it’s uploaded to Twitter, it will be reverted to its original orientation.
Another solution is to CTR-C the photo and CTRL-V it directly into twitter rather than loading an image file. That worked for me.
OH interesting… thanks Tom!