 tools in Mailchimp")
Are you using Mailchimp to its full potential for your business? Here are 7 of the best tools and tricks that you may have missed…
Everything we mention below is available on the free version of Mailchimp – bonus! 👍🏻
-
-
-
General Reporting
You’ve spent ages putting together your email and finally pressed that dreaded send button… But it’s not time to put your feet up just yet! It’s so important to measure and analyse the results of your campaign. Mailchimp offers in-depth reporting that can help you to refine and improve your emails every time.
You’ll find ‘Reports’ in the very top menu of Mailchimp, and the key stats to look out for are:
– Number of those who opened your email and the open rate
– Number of clicks within your email and the links that were clicked the most
– Number of emails that bounced (didn’t end up in someone’s inbox)
– Number of unsubscribes
– 24 Hour performance – this will show you the best time of day to send your email (based on opens and clicks over a 24 hour period)
– Subscribers with the most opens/clicks – these are warm leads and people you can always follow up
– Campaign benchmarking – This is relatively new to Mailchimp and shows you how your campaign compares to others in your industry
Tips from us: Keep an eye on the number of opens, clicks and unsubscribes you get with every campaign. Look for trends in high open rates and clicks – find out what subject line wording and stories your audience respond well to – and make sure you keep those up. If you find that some get more unsubscribers than others, you need to look at the content to see what may have turned them off. -
Previewing & Testing
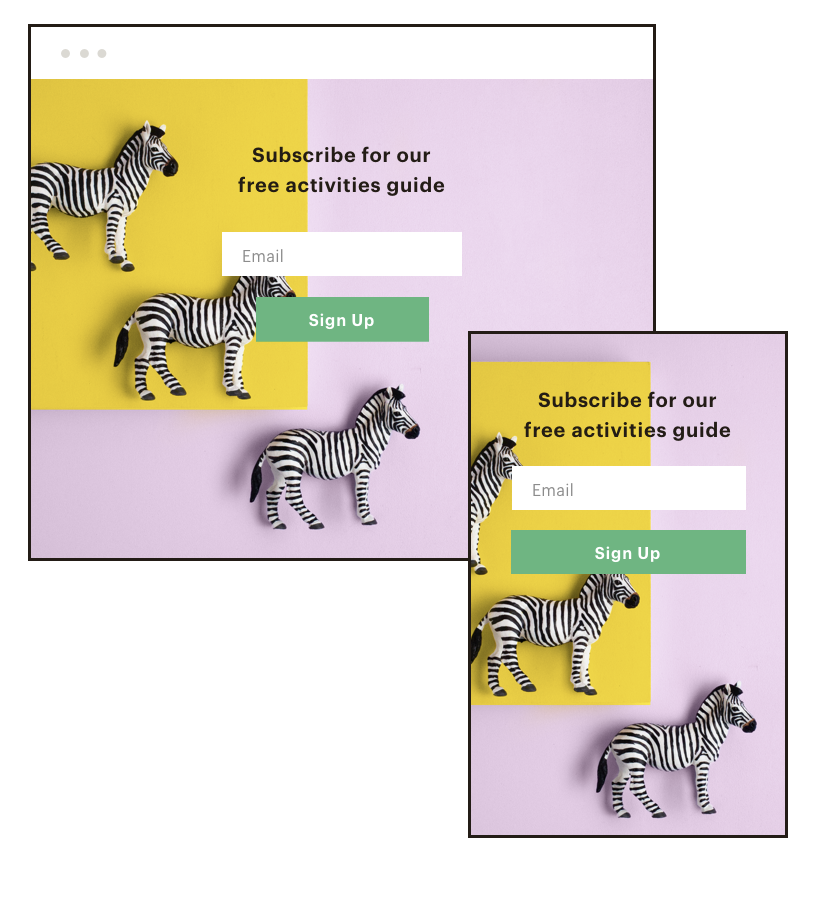
How will your email look on a mobile?
When in the ‘Content’ section of the Campaign Builder, at the menu at very top, you’ll see the ‘Preview’ dropdown. To see how your email looks on mobile, click on ‘Preview & Test’ and choose ‘Enter Preview Mode’. Here you can switch between Desktop and Mobile to preview your campaign.
Will your email display correctly in someone’s inbox?
We also highly recommend sending yourself a test of the email too. To do this, go up to the ‘Preview’ in the menu at the top and click on ‘Send a test email’ from the dropdown list. Enter in your email address and send. You can open up the email and see it from your customers perspective. Be aware that test emails could go into your spam – this is common and shouldn’t be an indication of your actual campaign.Do your merge tags work?
If you’re personalising your emails with merge tags (such as Dear *|FNAME|*), you can test these are working properly. To do this, when designing/writing your email campaign, click on ‘Preview’ in the top menu and click on ‘Enter preview mode’ from the list. On the right hand column of this page, toggle on the ‘Enable live merge tag info’ and you should see the personalised information populate into your email on the left. If it’s not working, we’d suggest looking into how merge tags work.

Tip from us: When receiving your test email, make sure to click on all the links in your email to check they go to the right place (text links and image links)! -
Tags
Not too long ago Mailchimp changed its pricing structure. Part of this means that now you have to pay monthly to have more than 1 audience (previously known as a list). (The exception being those of you that had more than 1 audience/list before they implemented the changes (a ‘legacy’ account) – you get to keep and use these audiences for free, you lucky people!).
To combat this, Mailchimp has improved their ‘Tags’ functionality, which enables you to tag individual contacts within your database and therefore send specific campaigns to these tagged individuals. Learn more about Tags on Mailchimp.
-
Landing Pages
Looking to build up your email database? With Mailchimp you can create on-brand and user friendly landing pages which host your email sign up forms. Whether you’re running a competition, promoting an offer or just encouraging people to sign up to your database, landing pages are so easy to use and directly link up with your Mailchimp email list.
Tip from us: Make sure you are being GDPR compliant! If you’re not sure about this, please get in touch as we’re GDPR consultants.
-
Segmenting
Using Mailchimp for your email campaigns allows you to capture lots of information about your audience. You can use this information to filter your contacts into segments and send them specific emails. Segments could include criteria such as:
– Subscribed contacts who opened any of your last 5 email campaigns
– Subscribed contacts who didn’t click in your last email campaign
– Contacts who live in a certain location
Learn how to get started with Segments.
Tip from us: Next time you send out an email campaign, wait a few days and then click on the function to resend it to just those who didn’t open your email yet. This will give those people a little reminder or, if they actually haven’t noticed it at all yet, another chance to see it! -
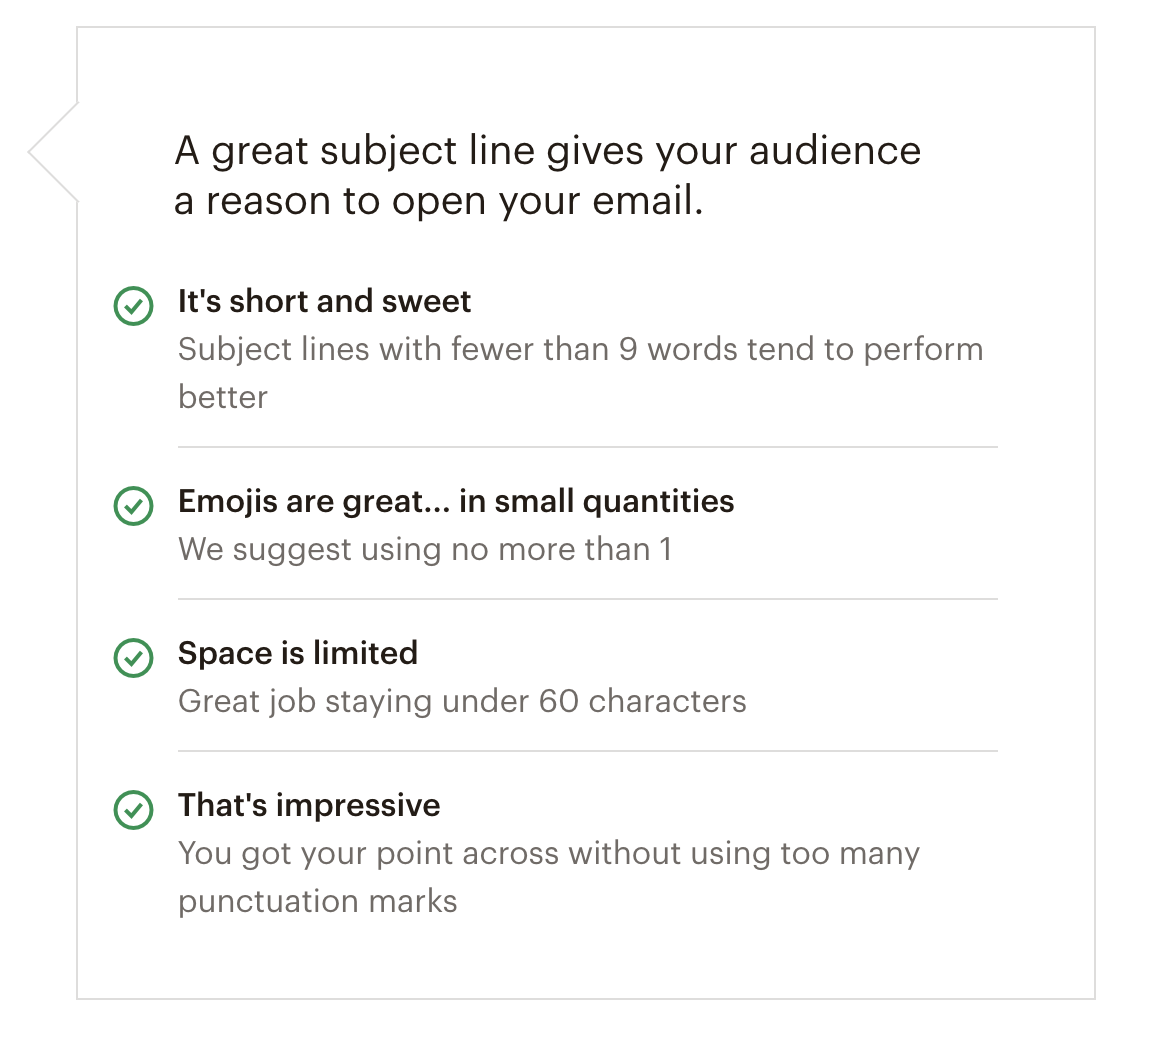
Subject Line Helper
Writing subject lines is always tricky. It’s such an important part to the success of your email campaigns. It needs to be strong and eye-catching enough to stand out amongst hundreds of other emails that land in our inboxes daily.
Mailchimp has a ‘Subject Line Helper’ which looks at your subject line and gives you advice on how to improve it. A good subject line according to Mailchimp should be less than 9 words and 60 characters, use no more than 1 emoji and a small amount of punctuation. You’ll see this tool pop up on the right hand side when writing your subject line in Campaign mode.
Tip from us: We suggest writing your subject line last. Once your email is ready to go, it’s always easier to pick out the most important element to form the basis for your subject line.
-
Mailchimp Automation
“Mailchimp’s automation feature allows you to create targeted emails that send when triggered by a specific date, event or contact’s activity”*. On the free plan of Mailchimp you’re able to send single automations (single emails). On some of the paid plans on Mailchimp you can send multiple automations (a series of emails).
Here are some of the examples of single automations you can create for free within Mailchimp:
– Welcoming subscribers. When someone signs up to your email marketing list, you’re able to set up an email to be sent automatically welcoming them to your list.
– Automatically sent emails to wish subscribers a happy birthday (if you have this information in your database!)
– Reminding people about a specific recurring date, e.g. renewing a membership.
– If you have e-commerce set up within Mailchimp you can create single automations such as thanking first-time customers, rewarding your best customers, retarget site visitors, send abandoned cart emails and more.
*Learn more about Mailchimp Automation.
-
-
Did you learn any new tips from us today? We’d love to hear if you did… Or are there any other tools in Mailchimp you’re loving right now?
If you’re still a bit bamboozled by Mailchimp, we offer Mailchimp training on a one-to-one basis across East Sussex, West Sussex and Kent (and further afield too!). Or if you’d rather hand over your email marketing to a specialist, we’d be delighted to help with our outsourced marketing service.


Leave a Reply